
Build Blog: Blog Image Generator Workflow
AI Disclaimer I love exploring new technology, and that includes using AI to help with research and editing! My digital “team” includes tools like Google Gemini, Notebook LM, Microsoft Copilot, Perplexity.ai, Claude.ai, and others as needed. They help me gather insights and polish content—so you get the best, most up-to-date information possible.
Author: Jorge Pereira
Date: June 2025
Tech Stack: n8n (Docker), Ollama, Open WebUI, JavaScript/HTML, Windows 11
The goal is simple: Create a web-based tool where you enter a blog post URL, and the system scrapes the title, generates an AI image, resizes it to a 1024×512 pixels (2:1 rati)o, and displays it back to you instantly.
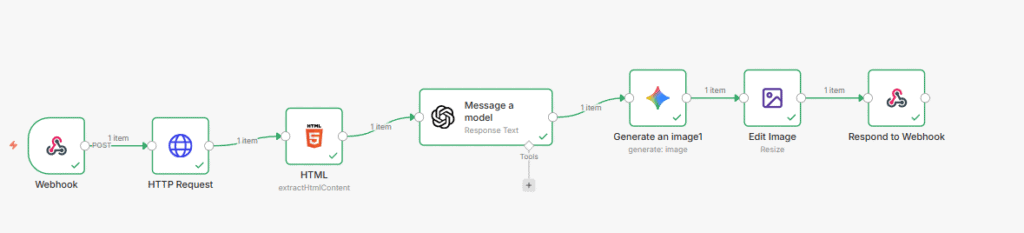
1. The Full Architecture
The process is a closed loop: It starts at the user’s browser, travels through n8n’s scraping and AI layers, and returns directly to the browser as a visual image.
HTML Form: User inputs a URL and clicks “Generate.”
Webhook: n8n receives the URL and holds the connection open.
HTTP Request: n8n visits the URL to download the raw HTML code.
HTML Scraper: n8n extracts the <h1> title from that code.
AI Image Gen: A prompt is built using that title to create a relevant image.
Image Editor: The AI result is cropped and resized to exactly 1024×512.
Webhook Response: The final .png is sent back to the browser.
2. The n8n Workflow Configuration
Node 1: Webhook Trigger (The Gateway)
- HTTP Method:
POST - Path:
GenerateBlogPostImage - Response Mode: Set to “Using ‘Respond to Webhook’ Node”.Crucial: Without this setting, the browser won’t wait for the AI to finish.
Node 2 & 3: The Scraper (HTTP Request & HTML Node)
You can’t scrape a title without first “fetching” the site code.
- HTTP Request: Use
GETand set the URL to{{ $json.body.url }}. Set Response Format toText. - HTML Node: Set Source Data to
JSONand JSON Property todata. Use a CSS Selector likeh1to grab the title.
Node 4: Image Editing (The Sizer & Namer)
To ensure every image fits your blog perfectly, use the Image Editing node:
- Action:
Resize - Width:
1024/ Height:512/ Mode:Cover - File Name (Expression): We use this JavaScript logic to turn a messy title into a clean, CamelCase filename:JavaScript
{{ "FeatureImage-" + $('HTML').item.json.title.replace(/[^a-zA-Z0-9 ]/g, "").toLowerCase().split(" ").map(w => w.charAt(0).toUpperCase() + w.slice(1)).join("") + ".png" }}
Node 5: Respond to Webhook (The Delivery)
This node sends the file back to your browser.
- Respond With:
Binary File - Binary Property:
data - Headers (The CORS Fix): To prevent browser errors, add these headers:
Access-Control-Allow-Origin:*Content-Type:image/png
3. The Frontend (The Trigger Page)
You can trigger this workflow using a simple HTML page. This script sends the URL to n8n and converts the incoming binary data into an image you can see.
This code creates a clean user interface. It uses the fetch API to send data to n8n and converts the incoming Binary Blob into a viewable image on your screen.
HTML
<!DOCTYPE html>
<html lang="en">
<head>
    <meta charset="UTF-8">
    <meta name="viewport" content="width=device-width, initial-scale=1.0">
    <title>AI Header Processor Pro</title>
    <style>
        body { font-family: 'Segoe UI', Tahoma, Geneva, Verdana, sans-serif; display: flex; flex-direction: column; align-items: center; padding: 40px; background: #f0f2f5; color: #333; }
        .container { background: white; padding: 30px; border-radius: 16px; box-shadow: 0 10px 30px rgba(0,0,0,0.1); width: 100%; max-width: 480px; text-align: center; }
        h2 { margin-top: 0; color: #2c3e50; }
        input { width: 100%; padding: 14px; margin: 15px 0; border: 2px solid #eee; border-radius: 8px; box-sizing: border-box; font-size: 14px; transition: border 0.3s; }
        input:focus { border-color: #ff6d5a; outline: none; }

        button { width: 100%; padding: 14px; background: #ff6d5a; color: white; border: none; border-radius: 8px; cursor: pointer; font-weight: bold; font-size: 16px; transition: transform 0.1s; }
        button:active { transform: scale(0.98); }
        button:disabled { background: #ccc; cursor: not-allowed; }

        #status { margin-top: 15px; font-weight: 500; color: #7f8c8d; }

        /* Results Area */
        #resultArea { margin-top: 30px; display: none; width: 100%; max-width: 1024px; animation: fadeIn 0.5s; }
        @keyframes fadeIn { from { opacity: 0; } to { opacity: 1; } }

        canvas { border-radius: 12px; box-shadow: 0 8px 20px rgba(0,0,0,0.15); width: 100%; height: auto; background: #ddd; }

        .button-group { display: flex; gap: 10px; margin-top: 20px; justify-content: center; }
        .dl-link { flex: 1; padding: 12px; border-radius: 8px; color: white; text-decoration: none; font-weight: bold; font-size: 14px; text-align: center; }
        .bg-green { background: #27ae60; }
        .bg-blue { background: #3498db; }
        .dl-link:hover { opacity: 0.9; }
    </style>
</head>
<body>

<div class="container">
    <h2>Header Processor</h2>
    <p>Generate, resize, and pad in one click.</p>
    <input type="text" id="blogUrl" placeholder="Paste blog post URL here...">
    <button id="btn" onclick="runWorkflow()">Generate & Process</button>
    <div id="status">Ready</div>
</div>

<div id="resultArea">
    <canvas id="outputCanvas" width="1024" height="512"></canvas>

    <div class="button-group">
        <a id="dlProcessed" class="dl-link bg-green" href="#">Download Processed (1024x512)</a>

        <a id="dlOriginal" class="dl-link bg-blue" href="#">Download Original Square</a>
    </div>
</div>

<script>
    async function runWorkflow() {
        const urlInput = document.getElementById('blogUrl').value;
        const btn = document.getElementById('btn');
        const status = document.getElementById('status');
        const resultArea = document.getElementById('resultArea');
        const canvas = document.getElementById('outputCanvas');
        const dlProcessed = document.getElementById('dlProcessed');
        const dlOriginal = document.getElementById('dlOriginal');
        const ctx = canvas.getContext('2d');

        if (!urlInput) return alert("Please enter a URL");

        // UI Reset
        btn.disabled = true;
        status.innerText = "Step 1: Fetching from n8n...";
        resultArea.style.display = "none";

        try {
            const response = await fetch('http://192.168.4.88:5678/webhook/GenerateBlogPostImage', {
                method: 'POST',
                headers: { 'Content-Type': 'application/json' },
                body: JSON.stringify({ url: urlInput })
            });

            if (!response.ok) throw new Error("n8n workflow error");

            // --- EXTRACT FILENAME FROM N8N HEADERS ---
            const contentDisposition = response.headers.get('Content-Disposition');
            let generatedName = "";

            if (contentDisposition && contentDisposition.includes('filename=')) {
                // Extracts the name from the header and removes quotes
                generatedName = contentDisposition.split('filename=')[1].replaceAll('"', '');
            } else {
                // Fallback: Generate a name from the URL if header is missing
                try {
                    const urlParts = new URL(urlInput).pathname.split('/');
                    generatedName = urlParts.filter(p => p).pop() || "blog-header.png";
                } catch(e) {
                    generatedName = "blog-header.png";
                }
            }

            // Remove the extension to add our own suffixes cleanly
            const baseName = generatedName.replace(/\.[^/.]+$/, "");

            const blob = await response.blob();
            const originalUrl = URL.createObjectURL(blob);

            const img = new Image();
            img.src = originalUrl;

            img.onload = function() {
                status.innerText = "Step 2: Processing 1024x512 canvas...";

                // 1. Process the Canvas (The Padding Step)
                ctx.fillStyle = "#0A5AA7"; // Background color
                ctx.fillRect(0, 0, canvas.width, canvas.height);

                const targetH = 512;
                const targetW = (img.width / img.height) * targetH;
                const offsetX = (canvas.width - targetW) / 2;

                ctx.drawImage(img, offsetX, 0, targetW, targetH);

                // 2. Setup "Download Original" using n8n filename
                dlOriginal.href = originalUrl;
                dlOriginal.download = `${baseName}-original.png`;

                // 3. Setup "Download Processed" using n8n filename
                const processedDataUrl = canvas.toDataURL("image/png");
                dlProcessed.href = processedDataUrl;
                dlProcessed.download = `${baseName}-1024x512.png`;

                // 4. Show Everything
                resultArea.style.display = "block";
                status.innerText = `Success! Retrieved filename: ${generatedName}`;
            };

        } catch (err) {
            status.innerText = "Error: " + err.message;
            console.error(err);
        } finally {
            btn.disabled = false;
        }
    }
</script>

</body>
</html>
4. Critical Troubleshooting Lessons
- The “422” Error: If testing with CURL in Windows PowerShell, you must escape double quotes:
\"url\":\"https://...\". - CORS Block: If the webpage says “Error,” ensure your Respond to Webhook node has the
Access-Control-Allow-Origin: *header. - Missing “data”: In n8n, the file is stored in a property called
data. Ensure your final node references this exact name in the Binary Property field.
Key Node Settings Recap
| Node | Field | Setting |
| Webhook | Response Mode | Using 'Respond to Webhook' Node |
| HTTP Request | Response Format | Text |
| HTML | JSON Property | data |
| Image Edit | Resize | 1024 x 512 (Cover) |
| Respond Webhook | Respond With | Binary File |
| Respond Webhook | Binary Property | data |
Why This Works
The magic happens in the Respond to Webhook node. By setting the Content-Type header to image/png and providing the Access-Control-Allow-Origin: * header, n8n stops acting like a simple data processor and starts acting like a specialized Image API.
Conclusion
By combining n8n’s ability to handle binary data with AI image generation, you can build a powerful internal tool that saves hours of design work. Your blog headers will now be perfectly sized, correctly named, and contextually relevant to your content.