

Windows Autopilot v2 (Device Preparation) How to do it

Checkout my other blogs about Windows Autopilot
Windows Autopilot device preparation (sometimes called V2 or “next-gen” Autopilot) in Microsoft Intune streamlines deployment by allowing IT to pre-configure apps, settings, and security policies , resulting in faster user-driven Microsoft Entra joins without needing hardware hash uploads.
Please see: Windows Autopilot: Moving to v2 (Device Preparation)
The Primary Question: Do Devices Need to be Pre-Registered?
Short Answer: No, devices do not need to be pre-registered with their hardware hashes to use Windows Autopilot device preparation.
Eliminating pre-registration is the primary structural change of this next-generation deployment fr
amework
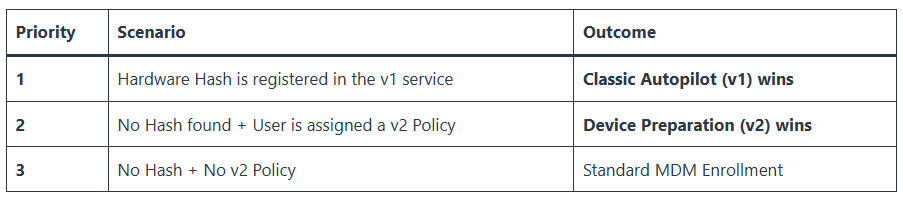
The typical follow-up Question is can Autopilot v1 and Device Preparation (v2) coexists?
The short answer is yes. You do not need to switch your entire organization to v2 overnight. Many enterprises are currently running both versions simultaneously. However there is a couple of caveats to be aware of:
Important Note: If you want a device to use the new v2 experience, you must ensure its hardware hash has been deleted from (or was never uploaded to) the classic Autopilot registration list.
More details on this: Windows Autopilot: Moving to v2 (Device Preparation)
How It Works Without Registration
- User-Centric Trigger: Instead of tracking device identity, policies target user groups. When an assigned user signs into a new or reset machine during the Out-of-Box Experience (OOBE), the deployment begins automatically.
- Dynamic Grouping: Once the user authenticates, the system automatically adds that specific hardware to your designated Intune device group.
Important Caveats
- Do Not Pre-Register: If a device is already registered or added to classic Windows Autopilot via hardware hash, the legacy Autopilot profile will take priority, and device preparation policies will fail.
- Personal vs. Corporate Enrollment: Because there is no hardware hash verification, Intune cannot natively distinguish personal machines from corporate ones at first boot.
- Corporate Identifiers (Optional Security): If you use Intune enrollment restrictions to block personal devices from joining, you must pre-upload the device’s basic corporate identifiers (Serial Number, Manufacturer, and Model) so Intune recognizes it as corporate property. This still avoids the tedious process of harvesting complex hardware hashes
How does it know it is a corporate device without pre-registration?
Behind the scenes, the process uses a shift in logic from traditional Autopilot. In classic Autopilot, the device’s hardware hash tells the OOBE screen which company it belongs to before anyone logs in.
With next-generation Device Preparation, the device actually starts as a standard, generic Windows setup. The mechanism that links it to your organization occurs dynamically through the following sequence:
1. The Generic “Work or School” Prompt
When a new device boots, it displays a standard Windows login screen asking for a Microsoft account.
- To trigger the corporate flow, the user must select “Set up for work or school”.
- As soon as they type their corporate email suffix (e.g.,
user@yourcompany.com), Windows reads the domain name.
2. Tenant Redirection & Branding Lookup
The moment the domain suffix is typed, Windows pauses and queries the global Microsoft Entra ID cloud authentication service (microsoftonline.com).
- Entra ID locates your corporate tenant based on that domain name.
- It instantly pushes your organization’s custom branding, logos, and specific login page formatting down to that local OOBE screen.
3. User Authentication & Policy Check
The user completes their sign-in and passes any corporate Multi-Factor Authentication (MFA) requirements. After authentication succeeds:
- Entra ID checks if that specific user account belongs to an assigned user group targeted by an Intune Device Preparation policy.
- If a policy matches, the Entra ID join token hands off instruction URLs directly to the local Windows MDM agent.
4. Just-In-Time (JIT) Device Registration
The local machine registers itself into your corporate Entra ID.
- Simultaneously, the Intune Provisioning Client service principal intercepts the new device ID.
- It instantly assigns the machine into the backend Assigned Security Device Group you created during setup.
- The policy configurations, tracked apps, and scripts assigned to that group are pulled down instantly, throwing up the Device Preparation progress screen
Step-by-Step User Experience
From the user’s perspective, the process is streamlined and mirrors a standard consumer Windows setup, with corporate enrollment happening automatically in the background.
- Unbox and Power On: The user unboxes the brand-new (or factory-reset) Windows device and turns it on.
- Basic Region & Keyboard Selection: The device boots into the Windows Out-of-Box Experience (OOBE). The user selects their Region and Keyboard layout, then connects to a Wi-Fi or wired network.
- Corporate Sign-In:
- Instead of a generic Microsoft account prompt, a branded corporate login screen appears once the network connection is established.
- The user types in their full corporate email address and password.
- They complete any required Multi-Factor Authentication (MFA) prompts.
- Device Preparation Screen:
- Immediately after authentication, a full-screen progress page appears.
- The user sees a clear, real-time status tracker divided into three main phases: Setting up your device, Installing apps, and Applying security policies.
- Desktop Readiness:
- Once the tracked apps (up to 10) and scripts complete their installation, the setup screen finishes.
- The user is immediately logged into the Windows desktop.
- Their primary business applications, security baselines, and configurations are already active and ready for immediate use.
Steps to Configure Device Preparation Policies (2026)
- Create a Device Group: Navigate to Microsoft Intune admin center > Groups > New group. Create an assigned device group (empty) that will be populated by devices during onboarding.
- Assign Provisioning Client: For the created group, ensure the Intune Provisioning Client service principal is the owner, or follow MS instructions to ensure the app ID exists in your tenant.
- Create the Policy:
- Go to Devices > Windows > Device onboarding > Enrollment.
- Under Windows Autopilot device preparation, click Device preparation policies > + Create.
- Configure Policy Settings:
- Select User-driven deployment.
- Name the policy (e.g., “Autopilot Device Prep”).
- Assign the device group created in Step 1.
- Configuration Settings: Choose apps (up to 10) and scripts (up to 10) to install during the process.
- Review and Create the policy.
- Assign User Group: Assign the policy to a user group (e.g., Azure AD group of users receiving devices).
Key Considerations
- Conflict: If a device is registered in classic Windows Autopilot, it cannot use Device Preparation, as the old policy takes priority.
- Requirements: Requires Automatic Intune enrollment to be enabled.
- Monitoring: Monitor progress in Devices > Monitor > Windows Autopilot device preparation deployments.
- Best Practice: Use this for new device setups to streamline app installations before the user hits the desktop.
Corporate Identifier List in Microsoft Intune
The Corporate Identifier List in Microsoft Intune is an optional security feature that allows IT administrators to pre-register company-owned devices (Windows, iOS/iPadOS, Android) by importing a CSV file containing unique device identifiers like serial numbers or IMEI. This list ensures devices are marked as “Corporate” upon enrollment, enabling automatic policy application and restricting personal device access.
Key Aspects of Corporate Identifiers
- Purpose: Distinguishes corporate-owned devices from personal (BYOD) devices to apply specific security policies, automate enrollment, and prevent unauthorized access.
- Supported Platforms: Windows 10/11, iOS/iPadOS, and Android.
- Windows Requirements: Requires a CSV file containing Manufacturer, Model, and Serial Number, typically for devices running Windows 10 KB5039299 (Build 19045.4598) or later.
- Mobile/iOS Requirements: Uses IMEI or Serial Number.
- Management: Administrators can add these identifiers in the Microsoft Intune admin center under Devices > Enrollment > Corporate device identifiers.
How It Works
When a device is enrolled, Intune checks if its identifier matches the pre-uploaded list. If a match is found, the device is immediately categorized as corporate-owned, bypassing restrictions that might block unknown devices. For Windows devices, this is particularly useful in conjunction with Windows Autopilot to ensure only authorized hardware enters the production environment
When You Can Skip It
- BYOD Environments: You do not need it if users enroll personal devices.
- Alternative Methods: You use other automated corporate enrollment methods.
- Examples: Apple Automated Device Enrollment (ADE), Android Enterprise, or standard Windows Autopilot.
What Happens Without It
- Default Tagging: Enrolled devices are automatically marked as “Personal” by default.
- Manual Changes: Admins must manually switch the ownership tag to “Corporate” later.
- Policy Risks: Devices might temporarily miss corporate-only security policies upon setup.
When It Is Highly Recommended
- Strict Blocking: You block personal devices but need specific hardware to enroll.
- Bulk Hardware: You buy standard Windows/iOS hardware outside of Autopilot vendor channels.
- Immediate Governance: Devices must receive strict corporate security configurations on minute one.


