
Unlocking the NPU: FastFlowLM

To learn more about Local AI topics, check out related posts in the Local AI Series
Part of: AI Learning Series Here
Quick Links: Resources for Learning AI | Keep up with AI | List of AI Tools | Local AI | AI Agents | Future of Work
Subscribe to JorgeTechBits newsletter

Disclaimer: I create this content entirely on my own time, and the views expressed here are mine alone (not my employer’s). Because I love leveraging new tech, I use AI tools like Gemini, NotebookLM, Claude, Perplexity and others as a “digital team” to help research and polish these articles so I can share the best possible insights with you!
How I Bypassed Ollama and LM studio Limitations on my Ryzen AI NPU to Hit 50+ TPS
If you recently purchased a modern AI-PC, you bought into a promising vision: a dedicated, cutting-edge Neural Processing Unit (NPU) sitting right inside your silicon, designed to stream large language models (LLMs) smoothly without draining your battery or spinning up your GPU fans. But if you are like me, your initial attempt to tap into that hardware felt like hitting a brick wall.
I started where most enthusiasts do: downloading industry staples like Ollama and LM Studio. I assumed they would automatically detect the specialized NPU. Instead, they ignored it entirely. Because these tools are architected for general-purpose GPU execution (CUDA/ROCm), my state-of-the-art Ryzen AI chip was sidelined. The system defaulted to heavy CPU emulation, yielding a sluggish, disappointing 3 to 10 tokens per second (TPS). It was inefficient, and left a massive piece of my processor sitting idle.
Then, I discovered FastFlowLM (FLM). (Video at the end of this blog post)
Video at the end of this
The Breakthrough: Native Hardware Optimization
FLM is built from the ground up to execute models natively on XDNA-based architectures. By leveraging AMD’s specialized kernel drivers, it bypasses standard GPU-centric abstraction layers to communicate directly with the NPU silicon.
The difference was staggering. The moment I initiated the FLM environment, it claimed exclusive, low-overhead access to the NPU. My standard daily-driver models jumped from single-digit speeds to a consistent 22 to 37 TPS. The generation was fluid, instant, and consumed virtually no background GPU resources. When I switched to edge-optimized small language models—specifically Meta’s llama3.2:1b—the performance cracked an unbelievable 50+ TPS.
| Inference Engine | Target Hardware Block | Avg. Performance | User Experience |
|---|---|---|---|
| Ollama / LM Studio | CPU (Fallback) | 3 – 10 TPS | Sluggish, high overhead |
| FastFlowLM (FLM) | Native Ryzen NPU | 22 – 37 TPS | Fluid, immediate |
| FLM (Llama 3.2 1B) | Native Ryzen NPU | 50+ TPS | Blindingly fast |
Setting Up Your Environment
Configuration I used:
- FastFlowLM in the host machine — (the only one as of now to utilize NPU)
- unless you changed the default, Model will go into c:\users\<user>\.flm\models
- Started with Llama3,2b:1B but later added llama3.2:3b and gemma4 and qwen3.5:4B and they workeed GREAT!
- Docker (because I like to keep my machine clean, and can configure many items virtually)
- Running OpenWebUI (see yml file below) for testing
- Added the Local LLM endpoint to my Unified AI CHat Hub Application (as per below)
To get started,
- you must first install the FLM Application directly on your Windows or Linux OS (Check out their GitHub repository). This binary acts as the bridge between your model files and the NPU silicon.
- Start FLM from the terminal using the following command:
- flm serve llama3.2:1b –host 0.0.0.0
- Note: If you use: the standard command: flm server lamma3.2.1b and do not use the –host 0.0.0.0 flag it will only bind itself to 127.0.01 (localhost) which means you will not be able to access it from other computers.
- You are not able to interact with llamma3.2.1b on the terminal. if you open another terminal session and type FLM list you will see all of the models available (a lot!) for your machine.
- While FLM runs well in a terminal, most users prefer a GUI to display the server status and to interface with the chat
- for a Display GUI of the Server ( where you can start/stop, configure the servier and also show NPU usage: there is a tool called FLM Companion (highgjly recommended!)
- For a front end chatbot I integrated my FLM instance into a containerized workflow using OpenWebUI and n8n. Because OpenWebUI expects an OpenAI-compliant API, you can point it directly to your local FLM serving port.
If you are using Docker, configure your docker-compose.yml like this:
services:
  open-webui:
    image: ghcr.io/open-webui/open-webui:main
    container_name: open-webui
    ports:
      - "3000:8080"
    environment:
      - ENABLE_OLLAMA=False
      - OPENAI_API_BASE_URL=http://host.docker.internal:52625/v1
      - OPENAI_API_KEY=flm
    extra_hosts:
      - "host.docker.internal:host-gateway"
⚠️ Crucial Note: Because Docker containers operate in an isolated network, routing is key.
ENABLE_OLLAMA=Falseprevents connection timeouts, whilehost.docker.internal(and thehost-gatewayflag) maps the container bridge back to your host machine’s FLM port.
Alternatively, if you have a different chatbot interface ( like my own: Unified Chat Hub) use
http://<your.IP.ADDRESS>:52625/v1/chat/completionsAnalyzing Real-Time Execution
When a request hits your stack, the handoff is immediate. The execution logs confirm the NPU engagement:
[🔗 ] TCP connection established - Remote: 127.0.0.1:61894
[🟢 ] NPU Locked!
[FLM] Model: gemma4-it:e4b
[FLM] Start prefill... (14 tokens)
[FLM] Start generating...
The [🟢 ] NPU Locked! status indicates that FLM has successfully bypassed the CPU/GPU bottleneck and established a direct hardware lock. The model prefill phase caches your context into high-speed memory, allowing subsequent inference to leverage the NPU for near-instant response times.
Quick Video I created here:
The Takeaway
NPUs represent a paradigm shift for local AI, but hardware is only as good as the software stack running on it. If you are stuck using legacy, GPU-dependent tools for your Ryzen AI silicon, you are leaving massive performance gains on the table. Moving to a native engine like FLM transforms your hardware from an underutilized component into a highly responsive, ultra-fast localized AI powerhouse.
Update: AS I researched and read more about these guys I noticed that FLM is now embedded into Lemonade: Local AI
Have questions, ideas to share, or just want to connect? I’d love to hear from you! Check out my About Page to learn more about me or connect with me.
- FastFlowLM · FastFlowLM
- Jorge’s Local AI Series | AI Learnings Series
- Google Gemma 4 Technical Report
- NVIDIA Nemotron Nano 3 Omni Documentation
Additional Analysis
After I ran the benchmark command:
flm bench llama3.2:1bI received:
Understanding the Terminology
- Context Length: This refers to the amount of text (measured in tokens, where 1,000 tokens ≈ 750 words) that the AI can “remember” or process at one time. Higher is better, but it is more demanding on hardware.
- TTFT (Time to First Token): This is the latency, or the delay, before the AI starts generating the first word of your answer. Lower is better. You want this to be fast so the AI feels responsive.
- Prefill Speed: This measures how quickly the AI “reads” or understands the input you provided. Higher is better.
- Decoding Speed: This is the rate at which the AI generates the text you see on the screen. Higher is better. Generally, speeds above 30–40 tokens per second (tok/s) are considered excellent, as they are faster than a human can read.
Analysis of the Results
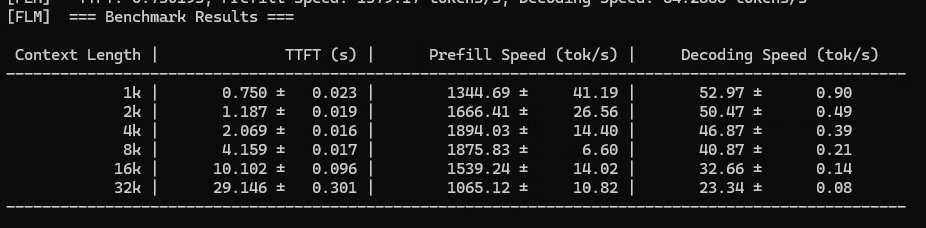
Looking at the data in image_bfe53d.png:
| Context Length | TTFT (s) | Decoding Speed (tok/s) |
| 1k | 0.75s | ~53 tok/s |
| 8k | 4.16s | ~41 tok/s |
| 32k | 29.15s | ~23 tok/s |
- For short conversations (1k–4k context): The performance is very good. A TTFT of under 2 seconds and a decoding speed above 45 tok/s will provide a smooth, snappy experience for daily tasks like drafting emails or simple queries.
- For long documents/complex tasks (16k–32k context): The performance drops significantly. A 29-second wait for the first response (TTFT) is quite long, and a decoding speed of 23 tok/s is slower, though still readable.
Is this “Good” for an AI PC?
Yes, this is solid performance for a local AI PC.
- Strengths: At typical conversation lengths (up to 8k tokens), this system performs very well and would feel fast to a user.
- Limitations: The system struggles as you push toward very long context lengths (32k), likely due to the hardware’s memory (VRAM) limits.
If your primary goal is to run a local chatbot for day-to-day writing and analysis, this hardware is doing a great job. If you intend to use it for analyzing massive technical manuals or extremely long documents (32k+ tokens), you might notice it becoming sluggish.
It really depends on the model you use! look at another ones I used:
And this one using gemma4
flm bench gemma4-it:e4b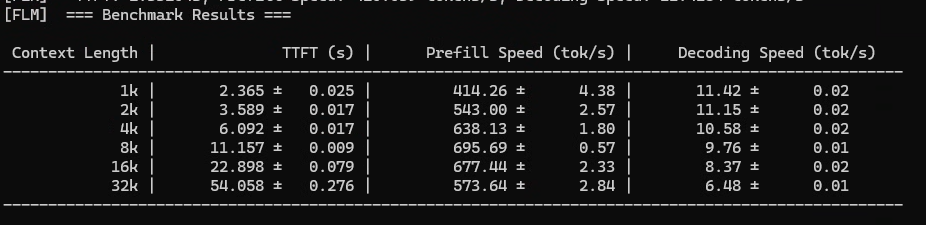
Summary of Performance
This data confirms that your local-first AI infrastructure is highly optimized for stability rather than just raw “burst” speed.
- Responsiveness: For typical interactions (1k to 4k), your setup is fast enough for fluid, real-time conversation.
- Long-Context Capacity: By maintaining a decoding speed of ~6.5 tok/s at 32k, your hardware is successfully avoiding the “total stall” that often happens when local systems run out of memory or compute bandwidth.
Overall, this is a very capable profile for a local AI workstation, especially if your workflows involve document analysis or long-form creative tasks where consistent generation is more important than immediate, sub-second responses.
One last thing: Hybrid Model GPU and NPU
I will write more about this in the future, but based on the design of the FastFlowLM (FLM) runtime, it is currently not possible to configure it to use both the NPU and the GPU simultaneously for the same model inference task.
FastFlowLM is intentionally built as an NPU-first runtime. The development team has focused on optimizing the inference pipeline specifically for the unique architecture of AMD’s Ryzen AI NPUs (the XDNA/XDNA2 tile-based architecture).
- Sequential Bottleneck: LLM inference is a sequential process where each layer of the model must finish calculating before the next layer can begin. Because of this, trying to split the workload across two completely different types of compute units (like an NPU and a GPU) would introduce massive synchronization overhead, likely making the system significantly slower than using just one of them.
- Specialized Kernels: FLM uses custom, highly optimized kernels specifically written to communicate with the NPU hardware. These are not designed to offload sub-tasks to the GPU.
Why You Can’t Simply “Turn On” Both
As discussed, the FastFlowLM (FLM) runtime is specifically architected to interact with the unique hardware of your NPU. Integrating both is not a simple settings toggle because of how LLM processing works:
- Sequential Bottlenecks: LLMs generate text token by token. Once the model is “prefilled” (it has read your prompt), the generation process is mostly limited by memory bandwidth. Switching the task between two different architectures (NPU and GPU) requires moving data across the system bus, which often introduces more delay than the speed gained by the parallel hardware.
- Architectural Differences: NPUs and GPUs use different data types and memory access patterns. Making them work in “lock-step” requires complex software orchestration that is currently not supported in standard end-user tools like FLM.
The “Hybrid” Future
The industry is moving toward what is called Disaggregated Inference. In this setup, systems are designed to intelligently split the workload:
- NPU handles Prefill: It is often excellent at processing the input text (prefill) quickly and efficiently.
- GPU handles Decode: It excels at the “decoding” loop—generating one token at a time—due to its high memory bandwidth.
More on this in a future blog post for sure!
Want More Updates? =>Subscribe to my JorgeTechBits newsletter


